Initial installation of OS |
Installing the operating system is almost reminiscent of a picture book. All views are still parts of the installation images that are obtained by taking the display window in the characteristic time of installation and to save space. Example installation DEBIAN Linux operating system refers to a new computer with Microsoft Virtual PC environment created. If you take that foundation Virtual PC a standard computer configuration, compared to the usual PC computer components without exotic no difference with regard to the installation process. So, the first step is to install Virtual PC for 'other' platform creating Debian.vmc computer with 512 MB of RAM, which will use virtual disk Debian.vhd up to 64 GB. Name of the virtual computer and disk is arbitrary.
By creating appropriate .vmc file and .vhd file, start the virtual machine and reach the installation CD or corresponding .ISO file. Perform repeatedly run the computer on 'hot' (reset) and followed reading the CD or .ISO file and installation of the operating system .vhd file. Size of .vhd file after installation, without installing additional software packages is about 4 GB. File .vmc describes a virtual computer in the form of xml record size of about 12 kB. Default settings that are available when you install is satisfactory. Due to the size of the virtual disk file of approximately 4 GB should take account of the selection of where to create the specified file. In relation to the actual computer disk resources are really minimal. Part of the content .vmc is shown on.
    <?xml version="1.0" encoding="UTF-16"?>
    <!-- Microsoft Virtual Machine -->
    <!-- Options and Settings -->
    <preferences>
      <version type="string">2.0</version>
           :
      <hardware>
      <memory>
        <ram_size type="integer">
              512
        </ram_size>
      </memory>
      <pci_bus>
       <ethernet_adapter>
               :
        <ide_controller id="0">
          <location id="0">
           <drive_type type="integer">
                1
           </drive_type>
             <pathname>
               <absolute type="string">
                 F:\VPC\Debian.vhd
               </absolute>
               <relative type="string">
                      .\Debian.vhd
               </relative>
             </pathname>
               :
          <video>
            <user_selected>
              <depth type="integer">
                    16
              </depth>
              <width type="integer">
                   800
              </width>
              <height type="integer">
                   600
              </height>
           <user_selected>
         </video>
          :
    </preferences>
As for the choice of installing Debian Linux operating system on a virtual PC emulation is not necessary to go through the installation media, but should take the already mentioned ...netinst.iso file. The example used is still 'Debian Lenny - Debian 5' distribution, operating system versions that preceded of the distributions 'Debian Squeeze - Debian 6', 'Debian Wheezy - Debian 7' and 'Debian Jessie - Debian 8', respectively is taken the file debian-50X-i386-netinst.iso, where X refers to the Review tag distribution, and on the same seat will be done during installation and upgrade. In this example, the chosen server of CARNet. When creating the virtual machine, as described in the chapter that deals with Virtual PC, to retrieve downloaded .ISO file choice /CD/-/Capture ISO Image.../. Major differences in installation between these distributions no.
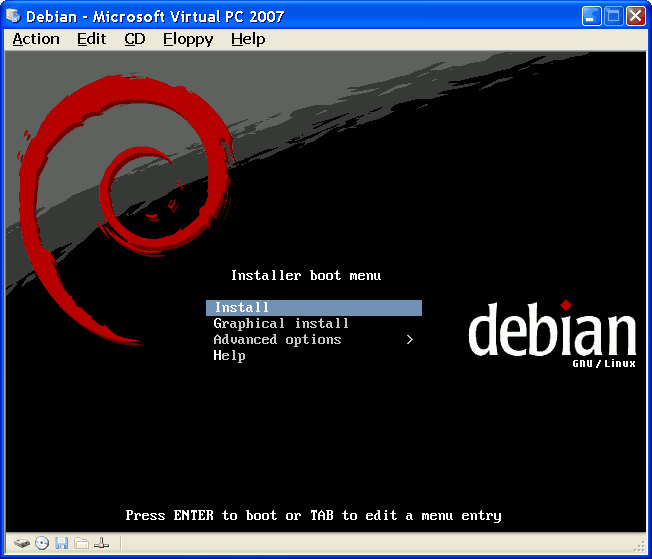
Since the installation procedure of OS is based on the network connection, the computer 'host' must be connected to the Internet (Virtual PC will automatically detect the network connection). Should be available DHCP service SOHO devices and authorization to the system shall be carried over, and the device should work in 'router' mode, which means that the user_name and password stored in the configuration of the SOHO devices. Depending on the type of processor, if any, should be excluded items /File/-/Options/-|Hardware Virtualization| and /File/-/Options/-|Full-Screen Mode| in 'Virtual PC' console (Figure 1b) if the installation is done on the computer where the microprocessor hardware device does not support virtualization. If you start the installation by connecting .ISO file stuck, helps action /Action/-/Reset/, and follows the first presentation of the next set of pictures.

|
| Figure*** 5.2 Start Installation / Select language settings. ( + / - ) |
Follow the installation mode selection, the language will be the default at installation, and was elected in this example English (only because so far all operating systems described in this way), followed by selection of state /other/-/--Europe--/-/Croatia/ and the keyboard layout /Croatia/. On the basis of this time zone will automatically adjust. Followed by detection of hardware and network configuration via DHCP service, you can do it manually /Configure network manually/ entering IP address, network mask, the output from the network IP addresses, hostname, and domain and follows the first image from the next set of pictures.
When you install the operating system 'Debian LENNY - Debian 5' views on the installation menu can happen to need to modify kernel parameters (kernel), so it is pressed <TAB> and in installation modify parameters in the parameter 'vga=normal' to 'vga=785' (640×480), 'vga=788' (resolution 800×600) or the 'vga=791' (resolution 1024×768) for 16-bit color depth, and add parameters 'noapic nolapic noreplace-paravirt'. For some reason the warning for button <TAB> in version 'Debian SQUEEZE - Debian 6' is not visible, although it is available. The process of installing the operating system version of 'Debian 5', 'Debian 6', 'Debian 7' and 'Debian 8' are virtually indistinguishable, and in the following description is not necessary to supplement anything about installing newer versions. After installing the graphics configuration file '/etc/X11/xorg.conf' is empty or incomplete, and should be included in it:
   Section "Device"
     Identifier        "Configured Video Device"
     Driver            "vesa"
     BusID             "PCI:0:8:0"
   EndSection

   Section "Monitor"
     Identifier        "Configured Monitor"
     Option            "DPMS"
     HorizSync         30-70
     VertRefresh       50-160
   EndSection

   Section "Screen"
     Identifier        "Default Screen"
     Monitor           "Configured Monitor"
     DefaultDepth      16
       SubSection "Display"
         Depth         16
         Modes         "1024x768" "800x600"
         Virtual       800 600
       EndSubSection
   EndSection
Some of these parameters related to the installation process, the color depth and resolution of the display, can be defined in the .vmc file. According to the needs of each installation should be carefully planned, and will depend on how and how much to take of the disk partition. How were available 17.2 GB virtual disk (it is not related to size .vhd files), for example, was chosen to drive the organization shown in Figure 5.1, as follows:
| Partition Type | Name of partition | Occupation of the disc |
| primary | SWAP | 10% |
| primary - active | / | 5% |
| logical | /boot | 5% |
| logical | /usr | 20% |
| logical | /var | 20% |
| logical | /tmp | 10% |
| logical | /home | 30% |
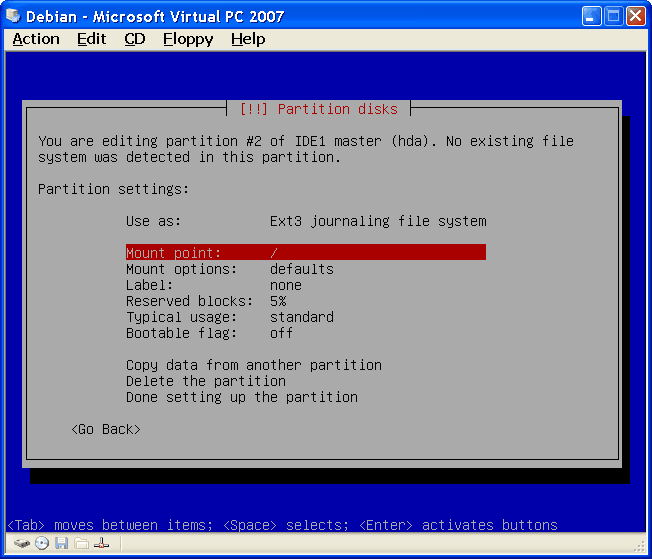
How to partition occupies disk space will depend on the purpose of server. If you need to serve many users in terms of personal resources available to them, most will go to [/home] partition where accommodation personal resources users, and if significant web content with associated services and electronic mail will increase [/var] partitions account previous stated because there would be anything related to the APACHE Web server, a temporary 'container' user for personal mail and LOG files in which each of the service records he was doing. The mechanism of the reach of each partition is based on the fact that each has something to attach (MOUNT) in order to become affordable. Basically all logical partitions will be attached to the primary partition that is active and can be recognized by the BIOS and where the MBR and the partition table, which is the ROOT partition [ / ], shown in Figure 5.1 marked ' Linux / '. When installing the partition operating system installation procedure will be done on the basis of setting up the records ' bootable flag: on ' as shown in Figure 5.4b. The table should be consulted when creating partitions to show pictures of the next set of pictures. Each choice retrieved via the arrow keys, and triggers <Enter> key. To each of the choices in the following representations, as the choice of type <Go Back>, comes the pressing <TAB>.
If it comes to configuring the server is good to determine the size of all the partitions manually according to the predefined plan, selecting as shown in Figure 5.3a. Figure 5.3b shows that it is available only one drive (hda) and takes the whole to be on it drafted the desired partition. It is recommended that the first disk partition is SWAP (Figure 5.3d) - virtual memory, in size from 150% to 250% of the physical memory (RAM), but not more than 4 GB. A higher percentage should be taken if the physical RAM less. A partition is a primary type (Figure 5.3c) and is not part of the file system (Figure 5.3d compared with Figure 5.4a). For work station can be selected that the entire rest of the disk after the SWAP partition, using the first selection in the Figure 5.3a, one just starting, a single primary partition that contains the directories named as shown in the above table.

|
| Figure*** 5.3 Disk Partitions / Parameters of individual partitions. ( + / - ) |
Unlike Windows, Linux can use a swap file or swap partition. The option of using SWAP partition is much better because it contributes to improved system performance.
Care must be taken to place the 'mounted' each partition created before confirmation of the data set for each of them (Figure 5.4b) and from the foregoing it can be concluded that the number of used three primary partitions one of which is EXTENDED and contains all logical partitions and can not see as a partition as shown in Figure 5.4c, but only its logical parts. Thus, the ability to exploit another primary partition is not used. When all the partitions are defined by the size of the type, and the point that you will 'hook' to make them of my financial reach (Mount point: according to Figure 5.4a), by choosing to show Figure 5.4c defined data to be stored and follows the recording of these data into a table partition and the installation of the base operating system. By this we will ask for a password for the administrator (ROOT or SUPERUSER user) and the definition of the first beneficiary (his full name of which is automatically generated USER_NAME which can be changed as desired).

|
| Figure*** 5.4 Schedule disk partition / Network upgrade installation. ( + / - ) |
If it is on the server, where the drive for better performance of reading and writing to it, divided into partitions according to the table above, only starting, according to Figure 5.4c partition is the first primary partition is available after the SWAP partition, and it is the ROOT [ / ] partition .
When the installation of the basic system .ISO file (or embedded optical media) completed follow asked whether the case would continue its updates over the network as shown in Figure 5.4d. Followed by selection of a site or mirror (copy content original seats) where they will perform automatic updates, as described on the following page. It is good to choose a site from which is download the install .ISO file. Care should be taken that these updates no matter where you are taken with the same ' X ', or revision label distribution, which has a base operating system installation.
Before downloading any additional packages over the network to determine whether the OS can get the necessary network parameters through DHCP mechanism of the device to which the computer is connected, as a SOHO router, or inside the network from which the OS is installed on the computer there is no DHCP services. If the DHCP service is not available in one of the menus that are related to network configuration should define the IP address of a computer, network mask, the IP address of the exit from the network and the IP address of the DNS server, similar to the settings described in Figure 4.4.32.
|
Citing of this page: Radic, Drago. " Informatics Alphabet " Split-Croatia. {Date of access}; https://informatics.buzdo.com/file. Copyright © by Drago Radic. All rights reserved. | Disclaimer |