Initial installation of Windows 7 |
The installation program support covers size single-layer DVD, which today is not a major problem because almost all computers have a DVD player. If you are making ISO file from the original installation media to get the file size is about 2.6 GB which allows the user to make a backup copy of your media (which is right), and it can add all the drivers he needed in the installation process, or create a separate media on who will write (burn). It is useful to check on the internet if there are any hardware for newer drivers than those supplied with the devices. Computer manufacturers and hardware are not prone to the development and distribution of media with newer drivers about additional costs which, with the present speed Internet access is of no importance. Rather new drivers posted on their sites because it costs nothing, and end-user support is much more efficient. The Internet has really changed much in the last decade.
Microsoft was once possible for end users to its servers as a free download .ISO file for the 'BETA' and then the 'RC' edition of Windows 7 in 32 bit and 64 bit version, of course, the application of data regarding the realization of legal rights for their use accepted the license terms. Said procedure has received diverse and vast group of test users, that is with your feedback enable the final product to be as good as possible. Based on commitments .ISO file can be created installation DVD, or else .ISO directly used to install the operating system in Virtual PC (VPC) computer, although it can be used to install and made the installation DVD. Further description of the installation follows the 'RC' versions of this operating system just in VPC computer, with an indication of the differences in relation to the 'BETA', 'RTM' and 'RTM' versions where relevant.
Basically the installation process on the physical computer is no different from further described in VPC computer, and in the case still is based on the installation of the operating system on two physical-virtual disk with two partitions on each. If a single physical disk partitions for easier maintenance and protection and preservation of data, and the separation of data from the operating system on a separate disk partition, it is certainly a good drive divided into several partitions. Even if you are using virtual machine with two virtual disk, as described further, instead of one virtual disk, virtual machine operation is noticeably faster. Already the clustering groups data into separate parts-partitions according to their fundamental characteristics (OS, software, data ...) accelerates the computer system in the end regardless of the number of used discs and facilitated the creation of backups or disk partitions. The decision to use one physical disk as a whole as a single disk partition is certainly not good, especially at a time when the disk capacity compared to the usual needs are enormous. Thus, the installation is based on the plan shown in the table on the previous page. It can be also use a different plan, but the basic guiding of its making is the use of multiple partitions with regard to the separation of user data from the partition on which the system is.
What to do if your computer is prepared for the 'young mom's dad wiseacre' and has only one drive? Then the two devices partition [C:] and [D:], in which the [D:] plans about 20-30 GB for the basic and the final image of operating system on the [C:] partition, and perhaps a few more later, which is hidden by making the 'invisible' directory and protect RO attribute. Young 'hustler' very soon anyway great [C:] partition filled games and who knows when the not migrated working and temporary folders, and then easily restore the system to its original condition, in terms of making new 'experiments'. When learn something about setting and maintaining the operating system it is possible to use the table.
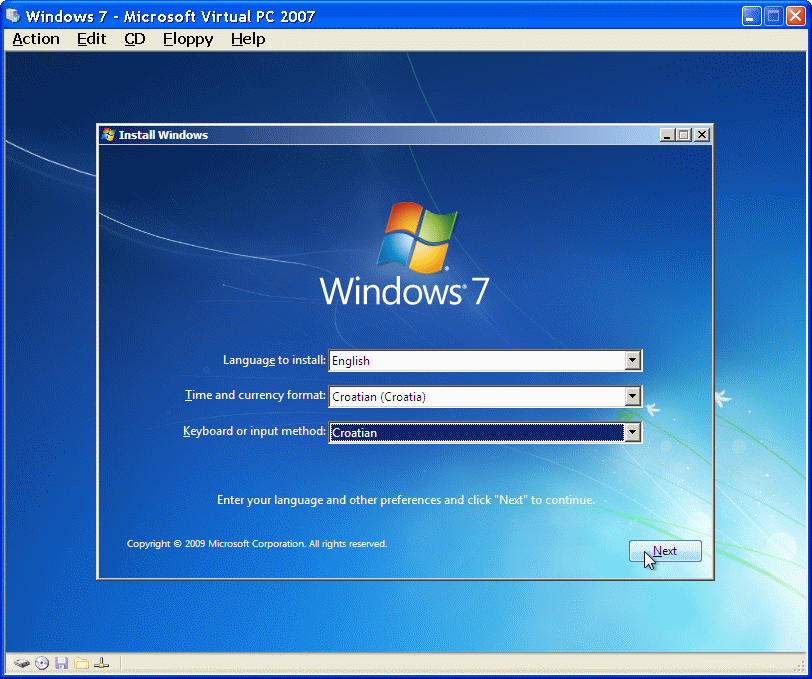
Step by reach .ISO file or optical installation media (as in the physical computer) by VPC computer (physical or computer) is to upload the files required to install and run the installation procedure. If you are installing on a physical computer prior to the BIOS to check and adjust if necessary the first 'BOOT' the device is an optical device. The content and layout of the BIOS, as well as the process of changing the order of 'BOOT' the device is not standardized. Therefore, on these pages will describe the setup procedure. But one of the possible design flow and advanced BIOS menu is shown in Figure 4.5.5d, where in the advanced menu, see the possibility of change 'BOOT' startup device. By recognizing the inserted optical media or ISO file if it comes to installing the VPC to download the initial base operating system into memory, and a very simple query about the location, and select the individual language settings, as shown below.
|
| Figure*** 4.5.5 Features of localities / Start the process of installing the OS / BIOS. ( + / - ) |
The installation process begins with defining the localization settings. Unlike the definition of localization in four places in the XP system, the process of defining the localization shown in Figure 4.5.5a is more than simple. Addition avoided the detailed network configuration which makes the installation process faster. When selecting the appropriate settings according to Figure 4.5.5 localization follows the opening page to begin installing the operating system according to Figure 4.5.5b.
Before starting the installation, it is helpful to read the comments at links:
When read carefully the instructions can be activated button |Install now| according to Figure 4.5.5b and afterwards request to accept license rights under Figure 4.5.5c, to be confirmed, and upon the acceptance of the same possible further installation. Start the installation seeks to define a method for installing the image of 4.5.6a. If an upgrade to the existing Windows operating system should select option |Upgrade|, and if it comes to installing a completely blank disc, should choose |Custom (advanced)| option is shown below 4.5.6a.

|
| Figure** 4.5.6 Choice of ways to install OS / Disk access and allocate disk space. ( + / - ) |
The following Figure 4.5.6b shows which drives operating system found. In this case showed that the entire disk is blank, unformatted and unavailable for recording (unallocated), that is not ready for data entry. Otherwise, it will show all existing disk partitions. If in such an environment, wants to re-install the operating system, it is necessary to delete the system partition and get to the same place to create a new one. Selection /Drive options (advanced)/ open a new menu as icons, as shown in Figure 4.5.6c, which allows the following actions with disks and their partitions:
|
Available are two options that can be used in the process of creating disk partitions and system updates of drivers during installation:
|
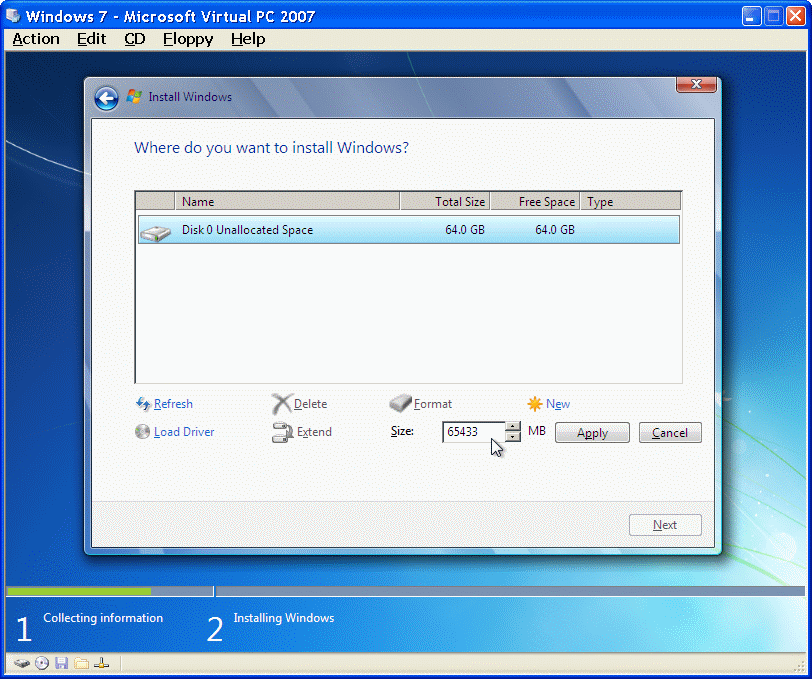
According to the table on the previous page made two partitions to describe the next images. Figure 4.5.7-1a is the result of action by choice |New| with images 4.5.6c.
|
| Figure** 4.5.7-1 Edit the first partition of disk space. ( + / - ) |
In the form |Size:| in Figure 4.5.7-1a inscribed disk size that was offered and accepted in the process of creating a virtual disk to the VPC, selecting 'Vista' operating system to install, which simulates the physical size of the disk and does not give the size of the corresponding him .VHD file, which is very small in the beginning, and which shall appear when you install the operating system dynamically increase the size of the writing to new files. In the present form should write a new value to the system disk partition and which according to the manufacturer should be at least 16 GB. After entering the values for the size of the system partition, it should be applied to the system by entering the MBR track on a disc or a choice |Applay| as shown in Figure 4.5.7-1b.
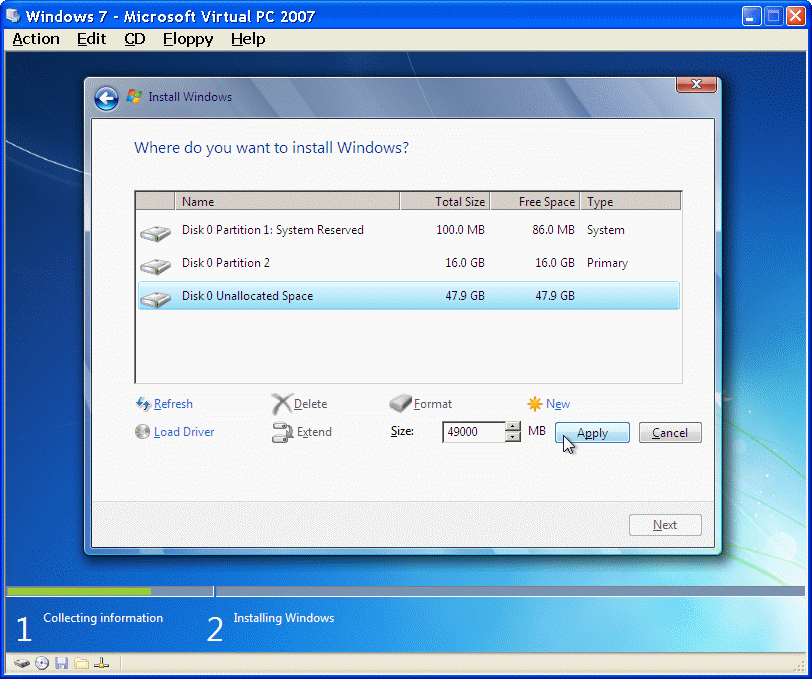
In the described procedure to create partitions will appear warning that says that the part of the disk used for system needs, and be prepared when the first partition is automatically created the first partition size of 100 MB (System Reserved) with systemic properties. The 'BETA' version of this operating system of this partition is 200 MB. Is followed by the MBR and made written and allocated the first system disk partition is automatically accepted as primary and then offer to enter the next size from the remaining unallocated partition of the disk as shown in Figure 4.5.7-2a.
|
| Figure* 4.5.7-2 Edit the second partition of disk space. ( + / - ) |
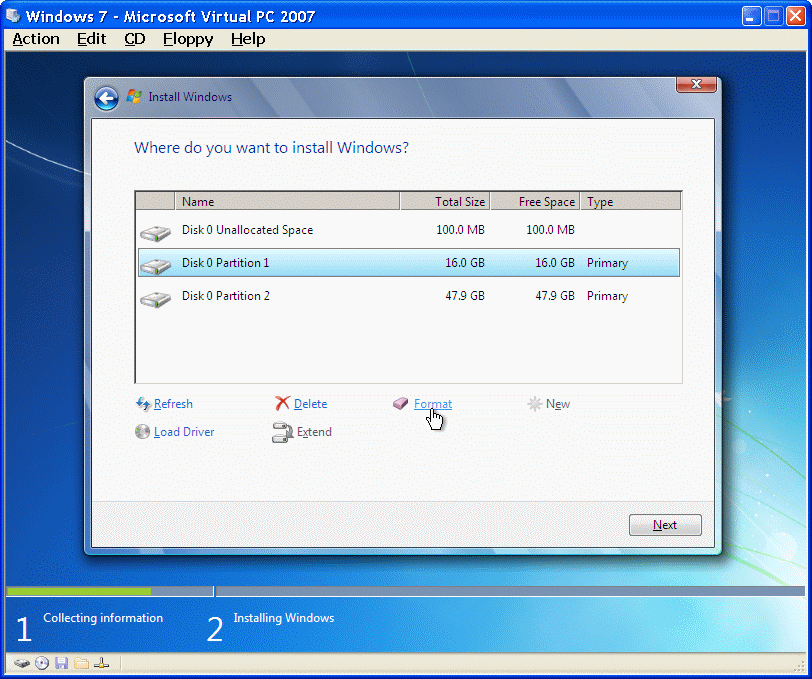
Temporary system partition size of 100 MB is the temporary storage of data (Windows XP for this purpose uses 8 MB) for the installation and you can not install the operating system. Attempting to install the OS on it followed by a warning about the failure to execute the selected task. Then he immediately accepted the offering good value for the second disk partition in the Figure 4.5.7-2a, because the additional work with other partitions can create another temporary system partition of 100 MB. After creating a partition on the disk this partition can be completely deleted from the list to display as unoccupied (unallocated) that would not have been visible system, as shown in Figure 4.5.8b. By creating a partition action L1 marked the partition on which you want to install and press button |Next| to continue. If the installation is done directly to the whole disk, without his division to partition, in a subsequent view with administrator tools to Figure 4.5.19, after installing the operating system of this space of 100 MB is automatically converted into unoccupied space (Unallocated Space) and is not shown in the list of drives, and the rest is one single active partition.
|
| Figure* 4.5.8 Edited partition to install the operating system. ( + / - ) |
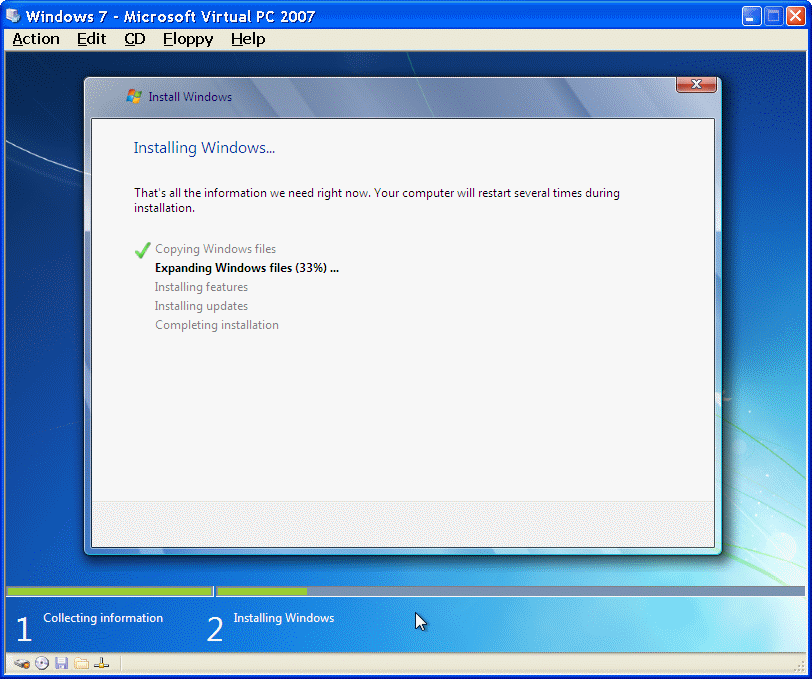
It is not necessary to be done by making the first partition the remaining unoccupied space immediately declared a partition and formatted. Stated better done later. Partition on which to install the operating system prior to installation must be FORMATED - prepared to accept data. The FORMAT of the VPC is not necessary because it is .VHD files already prepared for the reception of data as part of an existing operating system to the host computer, but this action is REQUIRED to make the new physical disk. Can be formatted and the other disk partition, although this can be done later. By selecting the partition to install the operating system, and its formatting choices |Next|, the installation procedure automatically classified as active partition (the system), and followed by copying the necessary files prepared in the computer memory to disk, and contacts the Microsoft server regarding access to available drivers and updates (installing updates), if the network resources are available, which in the autonomous case you did not install the upgrade performed after installing the operating system and its connection to the Internet. Illustrates the process of installing a set of Figure 4.5.9.
|
| Figure** 4.5.9 Flow of installing the operating system. ( + / - ) |
Installation progress depicts a line at the bottom of the display, which is filled with green, left to right installation procedure progresses. Issues 1 and 2 below clearly demarcated lines to which the torque data were preparing to install a memory of that moment and follow their prescription and configure the disk, especially the core operating system which is the most important part of the HAL (Hardware Abstraction Layer), software that representing an abstract layer for hardware connection between the physical computer hardware and operating system on the computer being used. The purpose of this layer is to facilitate the use of the operating systems on different hardware device platforms. Position the mouse pointer in Figure 4.5.9b marks the third phase begins when installing the operating system. During the installation process should not be removed from the installation media, optical devices or 'fire' .ISO. After copying files to the system partition VPC (or actually the computer) goes out and starts again to Figure 4.5.9c (Restart) correspondence and other media files that are marked as required for successful completion of the installation procedures. In certain phases of the installation is done change the display resolution and restart your computer.
|
Citing of this page: Radic, Drago. " Informatics Alphabet " Split-Croatia. {Date of access}; https://informatics.buzdo.com/file. Copyright © by Drago Radic. All rights reserved. | Disclaimer |